This year has started out very interestingly.
I had realized my Google Adsense ads were not showing anywhere on my other higher trafficked blog. I never had this problem before and I've had Google Adsense ads on the website for over 5 years. The first thing I did was looked into the auto-ads configuration. I didn't have it activated before, so I went ahead and did that and copied and pasted the script to the header. That didn't fix it.
New Adsense Rules for 2025
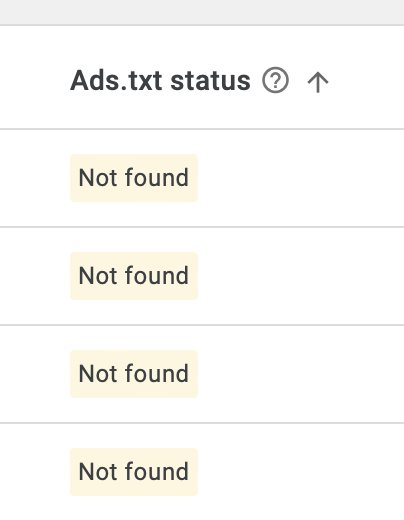
Then, this morning, I looked under my 'Sites' list under Google Adsense under my account and noticed that my
Ads.txt status was "Not found"! I don't know why I never saw this before, but it never stopped my ads from showing up prior to January 2025.
A Solution By Using Page Rule Under Cloudfare and Hosting Via Cpanel for a Different Site
Since I use a CMS to create my higher trafficked site, my domainame.com/ads.txt could not serve this ads.txt file as intended. The way that my CMS sets up my website is there is another directory for all media and files. Any of my files are not uploaded to the root level, including TXT files. I had to figure something out.
I clicked on the question mark bubble next to the Ads.txt status and it said I needed to upload the ads.txt file in a particular format at the root level.
Here's the article on how to do that from Google Support:
https://support.google.com/adsense/answer/12171612?sjid=15529272850796857791-AP#create. The content of the ads.txt should look like this:
google.com, pub-0000000000000000, DIRECT, f08c47fec0942fa0
The pub-0000000000000000 needs to be your personal Google Adsense publisher ID.
Since I use Cloudfare to have an SSL on my domain, I went in there and attempted to add the file under the root directory. Of Course, that didn't work because my pages are hosted from my CMS. So, after doing some research, I attempted to add a Page Rule under my Cloudfare account.
I also have a React web app that I use Godaddy Hosting to host the pages. I pay over a hundred dollars each year for hosting for that. I might as well take advantage of it and use it as the main way to store other files to help my other sites. Using the Cpanel, I uploaded my ads.txt file at the root level of that web app with the goal to create a Page Rule under Cloudfare for my higher trafficked website so that it will redirect there. Well, today, I've successfully done that so now, I'm just waiting for Adsense to crawl the page. The waiting game begins...
According to Google Adsense, "It may take a few days for AdSense to automatically crawl and verify your ads.txt file. Wait at least a few days for your ads.txt status to update. " So I just had to be patient.
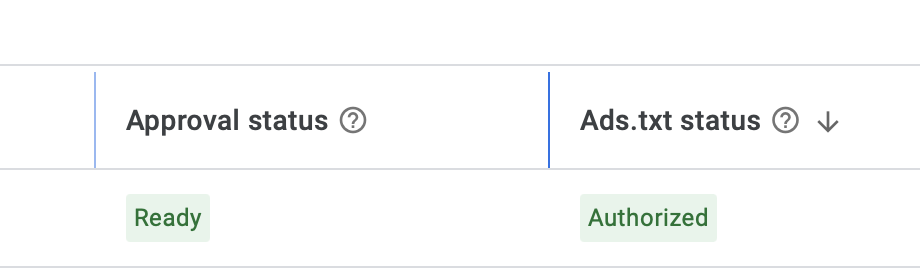
Google Adsense Successfully Crawled the Ads.txt File the Next Day
The next day, I checked my Google Adsense account under 'Sites', and saw that it's been successfully authorized. My screenshot is below. So, if you add the ads.txt file property or in my case, add a Page Rule redirect properly, it could take just 1 day.
And now, I'm not panicking as much, but I still can't see my ads and I wonder if it has to do with my VPN?
Later in the evening, I worked from my other laptop. All of a sudden, my ads from this tech blog finally showed up. I did not add any auto-ads code from Google Adsense. However, I did add the auto-ads code to my other higher trafficked site and Google Adsense ads were still not showing. So, I decided to do a test. I removed all of the code for auto-ads from Google Adsense from my higher trafficked site, and all of my Google Adsense ads finally showed up! I think Google Adsense was just malfunctioning yesterday. It's unclear? For some reason, those auto-ads made it worse, and didn't help.
Posted by Ninja Space Content. Posted In : Google Adsense

 I have been building simple websites on my own since 2008 and currently run several websites at the moment, including this one. I used to be an account manager for an affiliate/e-commerce company, helping affiliates grow their sales so I have some knowledge on the business side and client side of affiliate marketing. During the Covid-19 pandemic, I completed a JavaScript coding bootcamp and graduated in Dec 2020. I've been working as a contractor for a few software companies ever since.